I set a goal last month to complete 10 new pieces of work before April 2017. I do need to increase my inventory and as I have said before I have a lot of ideas. Considering my usual format of 11 X 14 I begin to map out my weeks to see if this really was feasible. If I had nothing else on my plate I could realistically complete two a month.
This time of year is busy though, with family, holiday parties, get togethers and gallery openings to attend. I know that I need to enjoy myself but also need to take my art seriously. It then occurred to me that I could rethink the size of my work. I had a lot of fun working on the 12 X 12 piece maybe go smaller than my usual size?
I use the 11 X 14 size because it is a standard size for framing but also it works well for landscapes or turned 14 X 11. I took this in consideration while at the art store. Turning around a corner in the store I find a pack of 8 X 10 museum wrapped canvases. The 5 canvases are wrapped around the wood frame so you really don’t need an additional frame.
This is what I used for the 12 X 12 piece I had done earlier so I know these will work for my fiber art. This size will fit the ticket perfectly, they will be easy to work on and I can get it completed fairly quickly.
I decided to wrap a base fabric around to back of the canvas similar to wrapping a present. I mitered the corners and glued the fabric securely to the framing around the back. The base fabric represents a plastered wall with interesting cracks and coloring. I used colored pencil on the fabric to emphasize the cracks and fissures on the wall. I used a yellow gold fabric to show a stone framed window on top of the base.

The green fabric will be shutters of a window then curtains in white on top of the green.
I search my stash of antique laces to use as curtains and find one that has an interesting scallop along with vertical lines. This will help move the eye downward to the base of the window frame. I decide to put three flowerpots in the window with some greenery planted.
I stitched down a wide dark green silk ribbon to anchor the curtains to the window. I add more colored pencil to the stone windowframe to add depth and highlights. All the while I keep adding more color to the plastered wall.
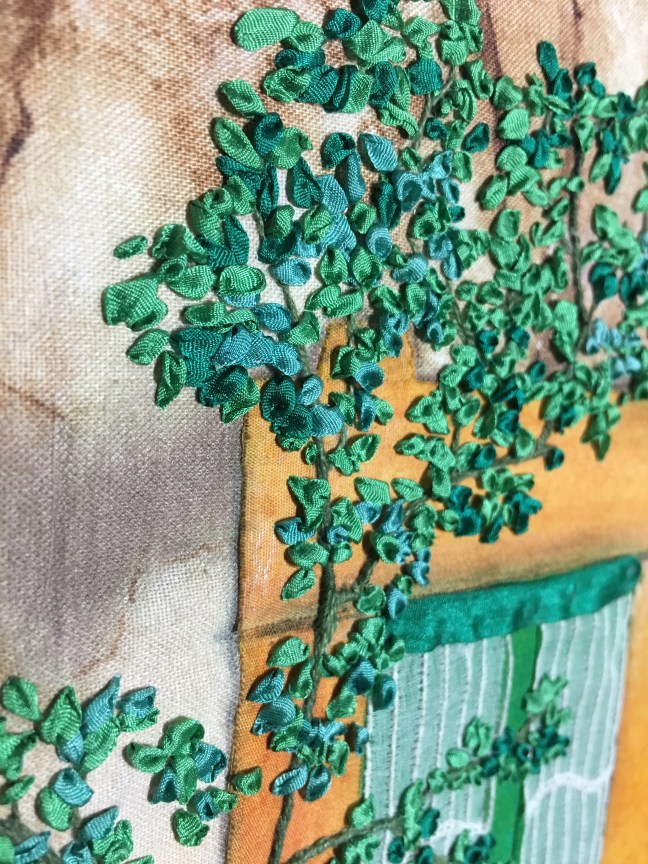
My plan is to add a wandering rose vine across the window from the left in a diagonal. This will add contrast from all the vertical lines of the window. I take my time with the vine/stem knowing that most of it will be covered with leaves. But you always need a foundation before you add the next step.
Using four different green colored silk ribbon I start adding the leaves using a simple ribbon stitch. This took the majority of the time to complete but they really turned out wonderful. Here is a side close-up to show the leaves.
Once I completed the leaves on the rosevine I added green leaves to one of the flowerpots, some tan colored stems to the middle pot and a tan and green stem on the last pot. The roses in a red silk ribbon are next, I used several different stitches to show variety and size.
Here is the completed piece, done in a week no less. I did have to remember I was working small as I did the roses, the scale I usually work is larger. Yet no problem here long as I keep things the correct size. As I finish the roses I see I need to darken some of the shadows around the window to anchor it to the wall. I also need to think on a title. Maybe Red roses, Fading beauty or something else. Take a look as I ponder the title. If you have a suggestion post it in the comments. As I look at this myself I see that you can make a big impact even with a small piece of art.


